Here's the deal, both Microsoft Exchange and Microsoft SQL Server have log files that are used to ensure the integrity of their databases in case of disk failure or power outage. As a safety check, these logs are not cleared until they have been backed up. So backup of these log files enables them to be overwritten. Conversely, however, NOT performing log file backups on these servers (say in a lab or development environment) means that they grow... and grow... and grow... sometimes to terabytes in size!
Two solutions:
1) Perform backups as if you were in a production environment
2) Disable the safety check so that your lab/dev/test environment doesn't preserve the log files past the point in which data from memory is written to disk.
Here's how to do the latter for both Exchange and SQL
Exchange: Enable Circular Log Files on the Exchange Mailbox Database
2) Log in with an administrative account.

3) Select "Servers" from the Lefthand Navigation bar
4) Select "Databases" from the Contextual Horizontal Navigation Bar
5) Select the database you want to enable Circular logging for and click the “Edit” pencil

7) Click on "Enable circular logging"
8) Click on "save "

9) Click OK to the warning message that appears

10) Select the database and click the elipses (...) in the menu bar and choose "Dismount"

11) Click on "Yes"

13) Click on "Yes"

 And now you've enabled circular logging in Exchange. That was the easy one.
SQL: Enabling Simple Recovery Mode in your databases
For more information on SQL's Transaction Log and the Simple Recovery mode check out these other articles:
Preventing Transaction Log Fires
My SQL Transaction Log is huge - should I switch to simple recovery mode?
1) Open the SQL Server Management Studio
Preventing Transaction Log Fires
My SQL Transaction Log is huge - should I switch to simple recovery mode?
1) Open the SQL Server Management Studio

2) Log into your SQL instance with sysadmin credentials

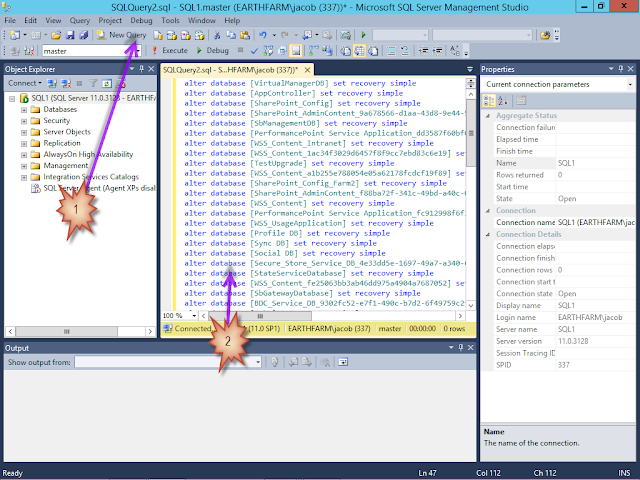
3) In the toolbar click "New Query"

4) You could now either open up the properties of the master database and each user database, go to the options section, and choose "simple" from the drop down menu for Recovery Mode or...
Copy and Paste the following script into the SQL Server Management Window

Copy and Paste the following script into the SQL Server Management Window
Use Master
alter database [model] set recovery simpleselect 'alter database ['+name+'] set recovery simple' from master.sys.databases where database_id > 4 and state_desc = 'online'
select 'use ['+name+'] checkpoint' from master.sys.databases where database_id > 4 and state_desc = 'online'
select 'DBCC Shrinkdatabase (['+name+'], 0) ' from master.sys.databases where database_id > 4 and state_desc = 'online'
select 'DBCC Shrinkdatabase (['+name+'], 0, TRUNCATEONLY) ' from master.sys.databases where database_id > 4 and state_desc = 'online'

5) Click Execute -
NOTE: If you perform these actions BEFORE installing SharePoint then you are done!
Already installed SharePoint? Keep going! -
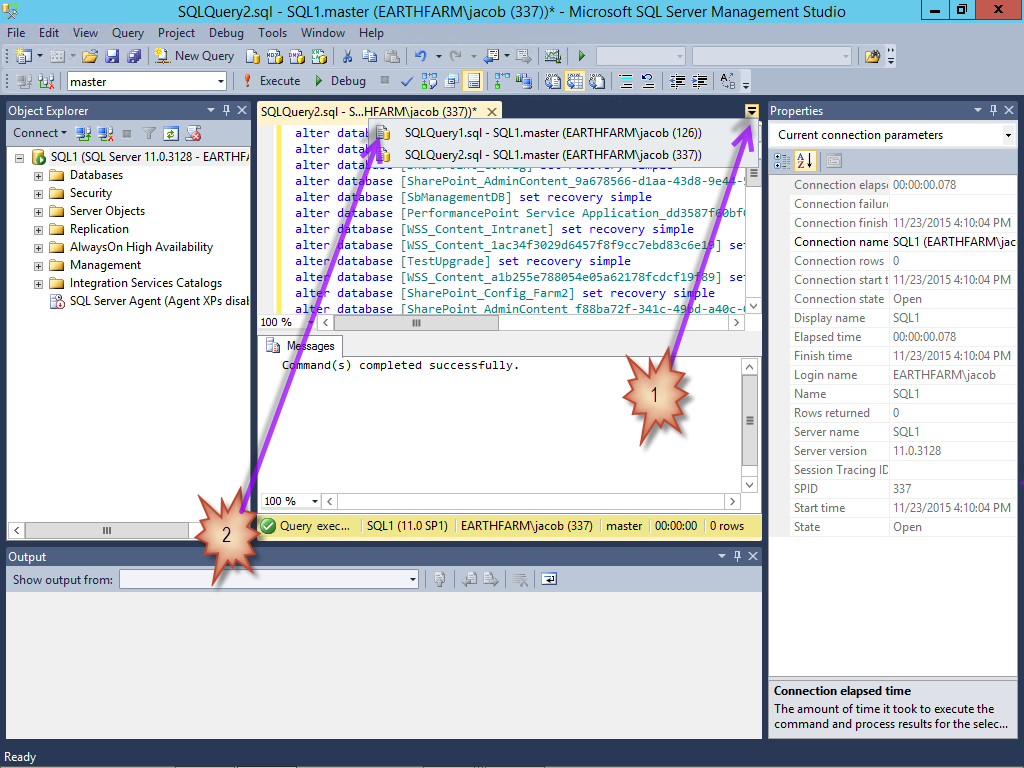
6) Right Click in the first results area below the script code and select "Select All"
7) Right Click in the first results area below the script code and select "Copy"

8) Click New Query
9) Paste the selected text into the query script window
10) Click Execute
11) Verify the commands completed successfully

12) Click the script file select drop down
13) Choose the first script file
 14) Scroll down to the Second result block
15) Repeat steps 6-13 for the Second result block

16) Scroll down to the Third result block
17) Repeat steps 6-13 for the Third result block
18) Scroll down to the Fourth result block
19) Repeat steps 6-11 for the Fourth result block
You're done - your log files are now under control for your lab/test/dev environment!

NOTE: If you perform these actions BEFORE installing SharePoint then you are done!
Already installed SharePoint? Keep going! -
6) Right Click in the first results area below the script code and select "Select All"
7) Right Click in the first results area below the script code and select "Copy"

8) Click New Query
9) Paste the selected text into the query script window

10) Click Execute
11) Verify the commands completed successfully

12) Click the script file select drop down
13) Choose the first script file
 14) Scroll down to the Second result block
15) Repeat steps 6-13 for the Second result block

16) Scroll down to the Third result block
17) Repeat steps 6-13 for the Third result block
18) Scroll down to the Fourth result block
19) Repeat steps 6-11 for the Fourth result block
You're done - your log files are now under control for your lab/test/dev environment!
No comments:
Post a Comment