I got into a bit of a freak out the other day.
I wanted to install SharePoint 2013 on a new server, but I couldn't because of .NET incompatibility. After some research I found that the problem was the same one that I had earlier had to unravel for my Exchange Server. It seems that unfortunately, the .NET Framework 4.6.1 is not compatible with many relatively recent Microsoft server products. If you are building images you'll want to make sure that you include images that do not include this component as it is not supported and may block new installations of products like these:- Exchange 2013, 2015
- SharePoint 2013
- Office Web Apps Server 2013
- Skype for Business Server 2015
Block it before it gets there!
You want to stick with .NET 4.5.2, so here's how to prevent the installation of 4.6.1Method 1:
- Back up the registry. (duh)
- Type regedit in the Start Search box, and then press Enter to open the registry editor
- Locate and click the following subkey:
HKEY_LOCAL_MACHINE\Software\Microsoft\NET Framework Setup\NDP - After you select this subkey, point to New on the Edit menu, and then click Key.
- Type WU, and then press Enter.
- Right-click WU, point to New, and then click DWORD Value.
- Type BlockNetFramework461, and then press Enter.
- Right-click BlockNetFramework461, and then click Modify.
- In the Value data box, type 1, and then click OK.
- On the File menu, click Exit to exit Registry Editor
- Back up the registry
- Instead of doing steps 2-10, create a text file with the following contents
Windows Registry Editor Version 5.00
[HKEY_LOCAL_MACHINE\SOFTWARE\Microsoft\NET Framework Setup\NDP\WU]"BlockNetFramework461"=dword:00000001 - Save the file as "BlockNETF461.reg" (remember adding quotes stops the .txt extension)
- Execute this file on any machine to block the installation until such time as you are ready for it.
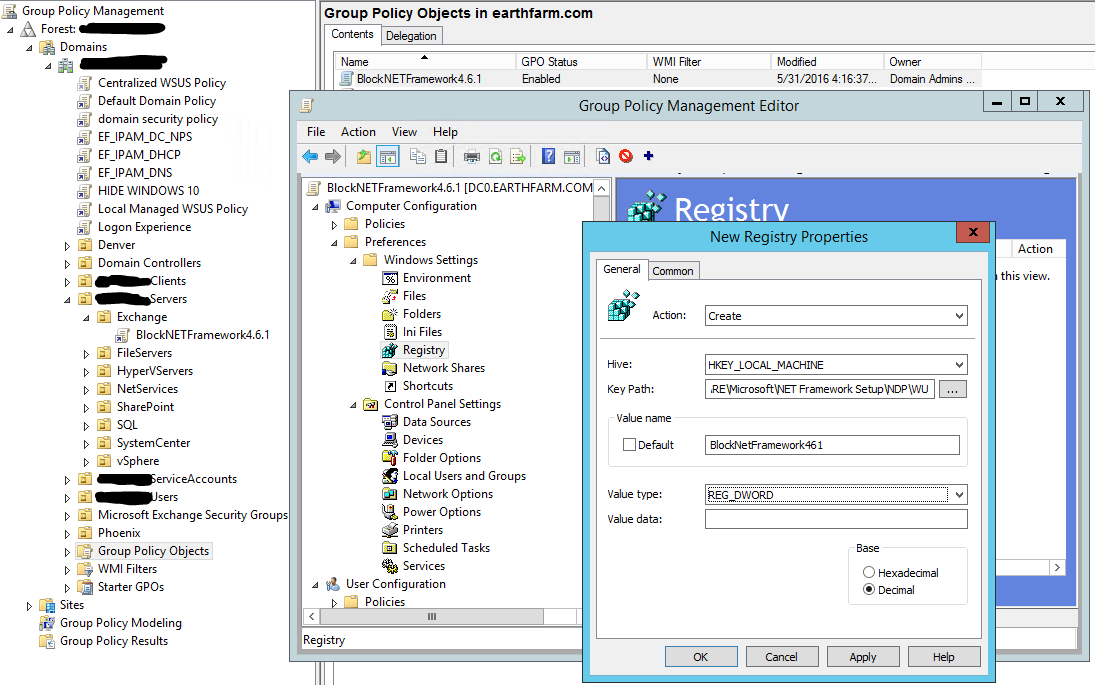
- Configure group policy preferences in an Active Directory managed environment. If you're not familiar with this tool, check out this article where I show you how to manage mouse sizes with GPO preferences: http://majorbacon.blogspot.com/2016/04/customizing-your-mouse-cursor-using.html
- In the GPO Management Console create a new GPO and link it to your OU of servers that you wish to prevent the installation of the .NET Framework 4.6.1
- Right click and Edit the GPO
- Expand the Computer -> Preferences -> Windows Settings -> Registry
- Right click and choose New Registry Item
- Change the Action to Create
- Enter the Key Path of SOFTWARE\Microsoft\NET Framework Setup\NDP\WU
- Enter a Value Name of BlockNetFramework461
- Select a Value Type of Reg_DWORD
- Enter the Value Data of 1
- Click OK and close the Group Policy Editor and Management Consoles. After the next group policy update on the affected servers the .NET framework will be blocked
But wait! .NET 4.6.1 is already installed!
If the .NET 4.6.1 update is already installed and you have not yet installed a server product (perhaps it is already in a baseline image) then you simply need to uninstall the update and run the repair tool
- First download the .NET framework verification utility from here: http://blogs.msdn.com/b/astebner/archive/2008/10/13/8999004.aspx
- Run the tool and use the drop down box to confirm that .NET Framework 4.6.1 is listed. (The tool shows all the versions of .NET that are installed.)

- Close the verification utility.
- Go to the add/remove programs control panel
- Select view installed updates (lefthand pane)
- find the entry for the dreaded KB3102467.
- Select and Uninstall the update.

- Reboot when prompted.
- Run the tool and use the drop down box to confirm that .NET Framework 4.6.1 is no longer listed. Verify that it is showing 4.5.2.
- Repair the .NET 4.5.2 installation by downloading the offline installer, running setup and choose repair

- Reboot when setup is complete.
- Apply the following Security updates for .NET 4.5.2 from Windows update
- KB3122654
- KB3127226
- Remember, Do NOT select KB3102467!!!!
- Reboot after installation.


But wait! .NET 4.6.1 is already installed AND I've already installed Exchange or SharePoint or Skype Server!
Don't Panic! The above steps still apply with just a few caveats
- Ensure you have rebooted since the installation of .NET 4.6.1 so that further management can occur.
- Stop all running services related to your product.
For example, in Exchange using the Exchange Management Shell
(Test-ServiceHealth).ServicesRunning | %{Stop-Service $_ -Force} - Perform the steps listed above to remove the offending update KB3102467
- Unfortunately, Many services must recompile all of their NET assemblies, a long and CPU taxing process. To alleviate this burden, the folks at the .NET Blog have provided a speedup script to allow mscorswv.exe to use multiple threads and up to 6 cores.
- Save the 7318.DrainNGenQueue.wsf script to the computer's desktop and execute it locally from the administrative command prompt using
cscript <path>\7318.drainngenqueue.wsf
Is this forever?
Of course not. Eventually you will be using products that are compliant with .NET 4.6.1 because you are working with the next generation product or because Microsoft has updated the previous generation product to be supported by .NET 4.6.1. Then you can remove the GPO preference or reg hack and allow your systems to update normally.