Showing posts with label SharePoint. Show all posts

Monday, October 19, 2015

There's a recycle bin for your Site Collection! Thank you PowerShell

As a SharePoint infrastructure administrator, I'm all about being able to delegate the ability to manage site collections to the users that really care about the data in that site. HOWEVER, sometimes even the most well intentioned site collection administrator may do the unthinkable and delete their own site collection and all the sub-sites within! If that happens in SharePoint 2013, however, you have no need to panic. Because you get to have one of these:
You get to go dumpster diving in a SharePoint Site Collection Recycle Bin!
But wait, you say, how do I get to this recycle bin when the normal way to access the recycle bin is a that Site collection Root, which I just deleted? The answer is... you guessed it, PowerShell!

Since the recycle bin is really maintained at the database level your site collection is still available for recovery, it is just a matter of using the right commands to undelete your site collection!

It's going to be a one-two punch.
1) Get your deleted site collection ID
2) Restore the deleted site collection

1) Get-SPDeletedSite | Select Path, SiteID

This will give you a list all the deleted site collections with their site collection ID values

2) Restore-SPDeletedSite -identity 4bfa0e0c-4e34-3b2a-9134-a23b13ababe1

The second command will restore the site collection and all subwebs from the recycle bin - no DBAs need to be awakened from their slumber!

Happy restoring!


SharePoint correlation IDs don't have to drive you crazy!

I have a serious love / hate relationship with SharePoint correlation IDs. You know - the ones that tell you that there was an error but are otherwise not very informative?

example of SharePoint 2013 Correlation ID
The beauty of Correlation IDs is that it you are given a reference point to track down log entries of relevance. Remember, it's not an error code, it is what it says it is - a correlation ID - a tool to grab related events in the log to get a better picture of why something failed and had to show you an on-screen error message!

You can use a Microsoft's now official (it used to be on CodePlex) Unified Log Service (ULS) Viewer to view the logs and even search by correlation ID, but you can also just fire up a SharePoint enabled PowerShell prompt and use Merge-SPlogfile to get the information faster!

This simple PowerShell cmdlet will allow you to search all the farm servers and find any instances of the correlation ID and show you the issues!
For example, to grab all of the events with the correlation ID in the graphic above and place the results in a text file instead of dumping on screen I would use the following command:

Merge-SPlogfile –Path c:\Mergelog.txt –Correlation 3410f29b-b756-694c-7a574ff74cab


For example, just today I just was getting an error when viewing content based on an external data type and received a correlation ID type error with little information in the error itself.

I ran the above command then opened excel and used the data tab in the ribbon to get external data from a text file and chose Tab Delimited. Then I formatted the results as a table and hid a few columns I'm not interested in.

The results looked like this:
Click to see larger

As you can see, the correlation ID is the same for all results (that's the point) so as I troll through the results I see things like error in the execution of the web part (true) and an Access Denied message from the secure store - and this was my problem, my user account hadn't been mapped to be able to use the secure store target application ID!

Let me know if this worked for you or if you have any questions! Happy searching!

Wednesday, April 30, 2014

Monitoring Settings in SharePoint Central Administration

In the Central Administration UI there are several different options related to monitoring your Farm. It's important to know what goes where, especially for those of you taking the 70-331 exam.

Let's think of it in terms of answering questions!

Video Format:
https://www.youtube.com/watch?v=Z5WG05c09lk

Text Format:


To answer these questions:
  • What errors or information goes into the Trace Logs (Unified Logging Service) and Windows Event Logs?
  • Where are the Trace Logs?
  • How long do I keep Trace Logs? 
  • How large can the Trace Logs be?
  • Is Event Flood Protection enabled?
Open "Configure Diagnostic Logging"

That takes you here:
For more on Diagnostic Logging and Trace Logs look here:
http://majorbacon.blogspot.com/search/label/ULS


To answer these questions:
    • Is Usage Data Collection enabled?
    • What Usage Events am I logging?
    • Where is teh Usage Data Collection Log located?
    • Is Health Data Collection Enabled?
    • What is the Health Data Collection schedule?
    • What is the Log Collection Schedule (the process that retrieves the usage log files and puts them into the database so that they can be processed for reports)
    • What is the Usage and Health Logging Database and Server (and credentials)?
     Open "Configure Usage and Health Data Collection"


     Which will take you here:


    Notice that by default Usage collection is disabled! That is good for performance, but means that you are not tracking any Web Analytics - how our system is actually being used.

    What if you want to change your SQL server or database? Never fear, it just has to be done in PowerShell:
    Set-SPUsageApplication -DatabaseServer <DatabaseServerName> -DatabaseName <DatabaseName>

    You can quickly enable or disable usage logging using PowerShell too:
     Set-SPUsageService -LoggingEnabled 1|0

    To answer the questions:
      • What are my slowest pages?
        (assuming you have already enabled usage and health data collection)
      • Who are my top active users?
       Open "View Health Reports"

      Which will take you here:


      To answer the questions:
      • What kind of bandwidth is being used?
      • What kind of File IO am I experiencing?
      • Where is all my usage and health data?
       Open "View Administrative Reports"

      Which will take you here:

      To answer the questions:
        • What SharePoint Errors in Security, Performance, or Configuration are available to detect?
        • Is a particular Rule Enabled and Schedule Correctly?
        • Will a Rule attempt to fix a problem automatically?

        Open "Review Rule Definitions"


        Which opens this:
        Which lists each Health Analyzer Rule which you can edit to manage the schedule and enabled aspects like this:

        To answer the question:

        • What Security, Configuration, or Performance Health Rules is SharePoint wanting to notify me of?


        Open "Review Problems and Solutions"

        Which will open this:

        You can open a problem to view the issue and potential solutions, and after fixing you can Reanalyze to remove the item from the list of problems


        To answer the questions:

        • What SharePoint timer jobs (like scheduled tasks) are enabled/disabled?
        • What is a job's schedule?
        • Where do I go to manually start a scheduled job?

        Open "Review Job Definitions"


         Which will take you here:


        Note the important filtering options to see service or web application specific jobs

        Select a job to view the job detail, manage the schedule, or run immediately.

        Finally,
        To answer the questions:

          • What jobs are scheduled
          • What jobs are running
          • What jobs have errored?

          Open "Check Job Status"


           Which will open the list of Timer Jobs with relevant lings to what is Schedule, Running, and the Job History of success or failure in the past:


          Well gang, I hope this clears up some of the questions you might have here in the Monitoring section of SharePoint Central Administration

          Correctly configuring the Diagnostic Levels in SharePoint 2013

          When things aren't going right and you post your problem to the forums, what do they always say? Check the logs! That's because you can use SharePoint 2013 Unified Logging Service (ULS) logs when troubleshooting. But... there are a lot of ways to configure those logs and for the 70-331 exam and the real world, you will want to take a look at some best practices:

          Change where the server writes logs.
          By default, SharePoint 2013 writes diagnostic logs to the installation directory, ie "%CommonProgramFiles%\Microsoft Shared\Web Server Extensions\15\Logs"
          Logs take space, and it would be pretty awful if you were resolving a SharePoint issue by enabling more logging only to cause additional problems because of your logging! Therefore, we should configure logging to write to a different drive by using the following PowerShell command:

          Set-SPDiagnosticConfig -LogLocation <PathToNewLocation>


          Note: The location that you specify must be a valid location on all servers in the server farm, and watch out for slow connections to network disk paths, especially if you enable verbose-level logging

          Define a maximum for log disk space usage.
          How much of your disk will the logs use? Imagine Sesame Street's Cookie Monster is the ULS logging service and your disk is a cookie. ULS logging in unrestricted by default in disk consumption. So the best practice is to restrict the disk space that logging uses, especially in verbose-level logging situations, so that when reaching maximum defined capacity the ULS service will remove the oldest logs before it recording new log data.
          Configure logging restrictions using the following PowerShell commands:
          Set-SPDiagnosticConfig -LogMaxDiskSpaceUsageEnabled
          Set-SPDiagnosticConfig -LogDiskSpaceUsageGB <UsageInGB>


          These two settings can be done in central administration in "Configure Diagnostic logging" settings
          Also, don't forget that you can enable Event Flood Protection to suppress repeated events from overflowing a log that is configured to be circular

          Set-SPDiagnosticConfig -EventLogFloodProtectionEnabled


          Choose your ULS logging levels carefully, especially Verbose
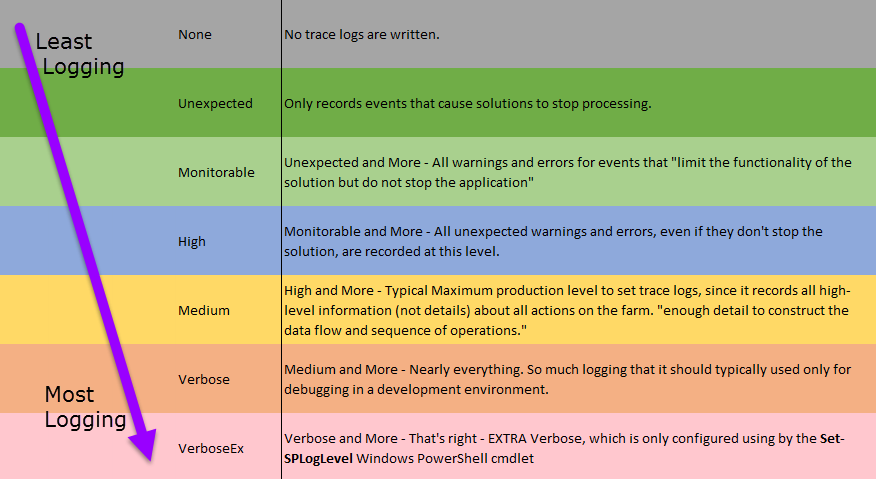
          Also called "event throttling" this is where you choose the depth of data collection for the ULS (trace logs) and the event logs. The Trace Log levels are described below.

          Typical Production settings will max out at collecting Medium Logging. Minimum Logging would be "Unexpected" Maximum Logging is Verbose which records every action, quickly eating drive space. Use verbose-level logging to record detail when making critical changes and then reset to a lower logging level.


          Similar precautions need to be taken for the Event Logging Levels:


          To Set Event Throttling use Diagnostic Logging in Central Administration or the PowerShell cmdlets:
          To set all levels:
          Set-SPLogLevel -EventSeverity <level>
          Set-SPLogLevel -TraceSeverity <level>

          To set both for one category you could use the following
          Set-SPLogLevel -EventSeverity <level> -TraceSeverity <level> -Identity "<category>"

          For example:
          Set-SPLogLevel -EventSeverity warning -TraceSeverity high -Identity "Search"


          Regularly back up logs.
          Diagnostic logs contain important data. Therefore, back up the logs regularly to ensure that this data is preserved. Use your backup software against the log directory.

          Read the Logs:
          Viewing the Logs: You can use Windows PowerShell to filter the data, display it in various ways, and output the data to a data grid with which you can filter, sort, group, and export data to Excel 2013.

          Get all the logs: (tmi!)

          Get-SPLogEvent

          Get filtered Log info: 

          Get-SPLogEvent | Where-Object {$_.<eventcolumn> -eq "value"}

          By area:
          Where-Object {$_.Area -eq "SharePoint Foundation"}


          By level:
          Where-Object {$_.Level -eq "Information" }


          By category:
          Where-Object {$_.Category -eq "Monitoring"}


          Search for text:
          Where-Object {$_.Message -like "people"}


          Output to a graphical grid - use the filtered search then pass results to out-gridview cmdlet
          Get-SPLogEvent | Where-Object {$_.Area -eq "Search"} | Out-GridView


          Of course you could also download the ULS viewer from codeplex to aid in viewing logs. More info on that here: 
          http://majorbacon.blogspot.com/search/label/ULS

          Happy Logging!
           

          Tuesday, April 15, 2014

          How do I change the Content Type Hub URL?


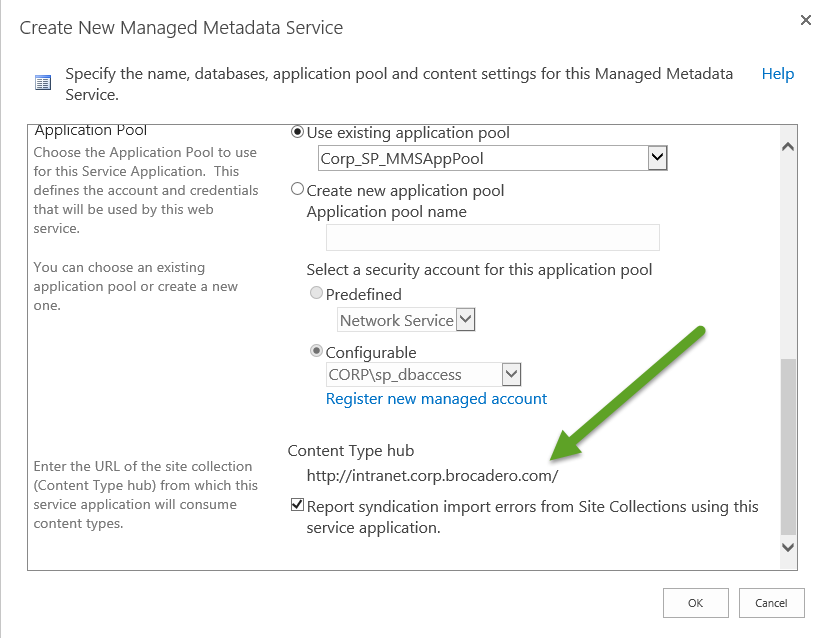
          The URLof the content type hub cannot be changed from UI of ShaerPoint Central Administration once we have the Managed MetaData Service (MMS) application created.

          We can however still change it by using Powershell! (Of Course)

          You'll need to know two pieces of information: What is the administrative name of your managed metadata service and what is the new URL you want to serve as the content type hub.

          Then just launch the SharePoint Management Shell as an administrator and execute the following:

          Set-SPMetadataServiceApplication -Identity "<ServiceApplication>" -HubURI "<HubURI>"
          So in my my example it would look like this:
          Set-SPMetadataServiceApplication -Identity "CORP Managed Metadata" -HubURI "http://intranet.corp.brocadero.com/contentHub"

          Then answer Yes to the prompt and you're golden! Here's the verification in the UI:


          Problem solved. Have a great day!

          Error: "Not able to connect to search service to retrieve valid settings" or Why won't my query builder work?

          So there I was, a SharePoint admin, trying to tweak Search like a good admin should to make my users' lives easier. SharePoint 2013 no longer uses Search Scopes to create a "less than everything" approach but instead uses a Result Source - which can be done centrally in the Search Application or in a decentralized fashion at the Site Collection level.

          To do this in the Site Collection Result Sources page is easy, and I can use the Query Builder to quickly verify my work.

          In the Central Administration site in the Search Application management settings, an administrator can do the same thing to create scopes... er Result Sources that are available to every single web application that uses this Search App. The Result Sources work fine, and the open text box will let you define the raw text of a working query with no problem, but if you quick Query Builder here, you get this:

          Not good.

          The quick fix is just to build the query at the site collection level then copy and paste the result to the Search Application level. 

          I found the longer fix was to crack open the SharePoint management Shell - here comes the PowerShell - and define my account as an SSA Admin. This is NOT well documented!


          Here's the code to add yourself as SSA admin:
          $principal = New-SPClaimsPrincipal "<domain>\<user>" -IdentityType WindowsSamAccountName

          $spapp = Get-SPEnterpriseSearchServiceApplication

          $security = Get-SPServiceApplicationSecurity $spapp –Admin

          Grant-SPObjectSecurity $security $principal "Full Control"

          Set-SPServiceApplicationSecurity $spapp $security –Admin


          This is just an example of using what is described here: http://technet.microsoft.com/en-us/library/ee704546%28v=office.15%29.aspx

          But it is odd that I SEEM to be a service administrator until I try and use the query builder.
          Also, the other error you are likely to see here is related to the needed installation of the SharePoint Web Part to enable the functionality of the query builder

          That one has a different error: "The search display templates are not present in this site collection."


          But a very easy fix in PowerShell:

          Enable-SPFeature SearchWebParts -url http://<central admin url>

          Good luck folks!
           

          Friday, April 4, 2014

          Why does SharePoint keep prompting me for credentials?

          Though SharePoint can be an anonymous Internet site, most often when we realize we are using a SharePoint site it is in the context of an authenticated space. There are many components to authentication, but the one that most end users notice is putting in their name and password. Unfortunately, when using an Internet-facing SharePoint site what they notice is that they have to put in their name and password over and over again, especially as they open various documents on the site.
          Here's what it looks like:
          (Authenticate into the site)
           
          (Go to open a document)
           
           (Authenticate again!)
           
          With Some Excel documents I've had to authenticate more than 3 times!

          It turns out that this is a client-side fix in most cases, due to the fact that for security reasons we don't want to automatically wander through internet content and downloads. Of course in this case we know that SharePoint should be trusted as an extension of our intranet into the Internet space. So that's how you fix it: you tell the browser that SharePoint should be trusted to receive automatic logons by adding it as a Trusted or Intranet Site. However, the fix is slightly different depending on which option you choose.

          First, the Intranet Fix:


          Open the SharePoint site first!
           

          Open internet options
           

          Navigate to the Security Tab and select Local Intranet, then click Sites
           
          Click Advanced to manually define Intranet Sites
           
          If you were viewing your SharePoint site already it should be listed in the "Add this website to the zone" dialog box. If not, you'll need to type it and then click Add. Internet-facing SharePoint sites should be secured with https, but if yours isn't you'll need to weaken security by removing the "Require server verification (https:)" checkmark.
           
          Voila! You're done and should only need to log in once to your SharePoint site from now on
           
          But wait a minute, some of you are saying, shouldn't I assign this as a Trusted Internet site instead of an intranet site? I mean, it is on the Internet...  To which I say, "Yes!"... but it is slightly more complicated.
           
          Same first steps, but this time choose trusted sites instead of intranet
          Open your SharePoint Site first
          Open internet options
          Navigate to the Security tab, choose Trusted sites, then click Sites
           
          Your site should be present in the address bar, click add and close
           
          With Trusted Sites still selected choose Custom Level
           
          At the bottom of the list of custom settings, change User Authentication to "Automatic logon with current user name and password"
           
          Voila! You now have the added protection of Trusted Internet sites with the ease of authentication found in intranet sites.
           
          Happy SharePoint!